Previously, we modified the MNIST For ML Beginners Tutorial to process Mini-MIAS imagery. The results of this were not great. Let's try this again but with a simple Multilayer Convolutional Network (CNN) in TensorFlow. Once again, we will be using The mini-MIAS database of mammograms[1].
What is a Convolutional Neural Network?
In a Convolutional Neural Network we are going to mimic the way our brain's visual cortex works to perform image recognition. In fact, the word "convolution" is borrowed from biology's description of the brain:
Convolution (noun) - One of the irregular ridges on the surface of the brain and especially of the cerebrum of higher mammals [1]
The visual cortex is composed of multiple levels or layer of neurons, with parts of each layer firing when they recognize certain objects. At the lowest layers these objects are simple things like colors or lines. At the highest layers these objects could be a friend's face. The layers in between combine base objects into various forms and shapes until the higher layers recognize those forms.[2]
Our Convolutional Neural Network will mimic this process by making multiple passes at each mammogram, with each pass representing a layer of the cortex. In the first pass we will look at a single pixel in the image, in subsequent passes we will build increasingly larger square clusters of multiple pixels. This process is shown below with facial recognition:

Credit: https://deeplearning4j.org/neuralnet-overview
Code Tutorial
Note that this dataset only contains 322 images, which is not nearly enough data to successfully train a model. However, this exercise will still serve to walk through how to adapt an existing image recognition model to our specific use-case. Later attempts will be made with more complex code and larger data sets.
The full code for this tutorial is on GitHub in the file Mini-MIAS-Multilayer-Convolutional.py. I will focus this post on the portions of this code that differ from both the Tensorflow MNIST tutorial and my previous MNIST for Beginners walk-through. If you have not gone through the MNIST tutorial, you should do so first.
After processing the images from files into arrays, we follow the tutorial through the first two convolutions with minimal changes. In the model set up and the first convolutional layer alter the image sizes from 28*28 to 1024*1024 to adjust from MNIST to Mini-MIAS:
x = tf.placeholder(tf.float32, shape=[None, 1024*1024])
...
x_image = tf.reshape(x, [-1, 1024, 1024, 1])
Once we get to the densely connected layer, we have to make additional alterations. In the MNIST tutorial they perform two 2x2 poolings on the 28x28 image. The first convolution looks at a 14x14 representation of the image, with the second convolution reducing the image to 7x7[3]. Our 1024x1024 image will similarly have each dimension reduced in half after two convolutions, resulting in passing a 256x256 image into the deeply connected layer.
# Densely connected layer
W_fc1 = weight_variable([256*256*64, 256])
b_fc1 = bias_variable([256])

h_pool2_flat = tf.reshape(h_pool2, [-1, 256*256*64])
h_fc1 = tf.nn.relu(tf.matmul(h_pool2_flat, W_fc1) + b_fc1)

# Dropout
keep_prob = tf.placeholder(tf.float32)
h_fc1_drop = tf.nn.dropout(h_fc1, keep_prob)

# Readout Layer
W_fc2 = weight_variable([256, 7])
b_fc2 = bias_variable([7])
Note also that the bias variable here is 7 because the mammograms can be labeled with 7 different diagnoses. This value is 10 in the MNIST tutorial because the images could be one of ten possible numbers.
Results
If your data set is sufficiently large and sufficiently randomized, you can often take the tail to use as your test data. Unfortunately the Mini-MIAS data set is neither. What we've done here is take the head of the dataset, the first 31 records, for the eval set and exclude them from the training set:
test_xs = numpy.zeros((31, 1024*1024))
test_ys = numpy.zeros((31, 7))
for i in range(31):
  test_xs[i] = images_train[i]
  test_ys[i] = labels_train[i]
How do we do? Not as awful as last time!
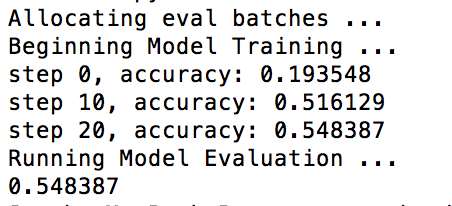
54% accuracy is still pretty poor, but we showed improved accuracy moving from a pure statistical model to one that takes advantage of the structure of the image. With higher-resolution images, a larger data set, and some additional model tweaks we should be able to do better.